Introducing Containers
Overview
Teaching: 20 min
Exercises: 0 minQuestions
What are containers, and why might they be useful to me?
Objectives
Show how software depending on other software leads to configuration management problems.
Identify the problems that software installation problems can pose for research.
Give two examples of how containers can solve software configuration problems.
Disclaimers
-
Docker is complex software used for many different purposes. We are unlikely to give examples that suit all of your potential ideal use-cases, but would be delighted to at least open up discussion of what those use-cases might be.
-
Containers are a topic that requires significant amounts of technical background to understand in detail. Most of the time containers, particularly as wrapped up by Docker, do not require you to have a deep technical understanding of container technology, but when things go wrong, the diagnostic messages may turn opaque rather quickly.
Scientific Software Challenges
What’s Your Experience?
Take a minute to think about challenges that you have experienced in using scientific software (or software in general!) for your research. Then, share with your neighbors and try to come up with a list of common gripes or challenges.
You may have come up with some of the following:
- software that doesn’t exist for the operating system (Mac, Windows, Linux) you use or want to use.
- software that is hard to install because you have to install a bunch of other things first (and those installations required other installations…).
- you’re not actually sure what software you’re using because the install process was so circuitous.
- you and a colleague are using the “same” software but have installed different versions.
- you installed everything correctly on your computer, once, but now need to install it on your colleague’s computer, or on the campus computing cluster.
- you’re writing a package for other people to use, but you get a lot of emails from people who can’t install it.
Etc.
A lot of these characteristics boil down to one fact: the main program you want to use likely depends on many, many, different other programs (including the operating system!), creating a very complex, and often fragile system. One change or missing piece may stop the whole thing from working or break something that was already running. It’s no surprise that this situation is sometimes informally termed “dependency hell”.
Software and Science
Again, take a minute to think about how the software challenges we’ve discussed could impact (or have impacted!) the quality of your work. Share your thoughts with your neighbors. What can go wrong if our software doesnt work?
Unsurprisingly, software installation and configuration challenges can have negative consequences for research:
- you can’t use a specific tool at all, because it’s not available or installable.
- you can’t reproduce your results because you’re not sure what tools you’re actually using.
- you can’t access extra resources because you’re not able to replicate your software set up.
Thankfully there are ways to get underneath (a lot of) this mess: containers to the rescue! Containers provide a way to package up software dependencies and access to resources such as files and communications networks in a uniform manner.
What is a Container?
Docker is a tool that allows you to build what are called “containers.” It’s not the only tool that can create containers, but is the one we’ve chosen for this workshop. But what is a container?
To understand containers, let’s first talk briefly about your computer.
Your computer has some standard pieces that allow it to work - often what’s called the hardware. One of these pieces is the CPU or processor; another is the amount of memory or RAM that your computer can use to store information temporarily while running programs; another is the hard drive, which can store information over the long-term. All these pieces work together to do the “computing” of a computer, but we don’t see them, because they’re hidden away.
Instead, what we see is our desktop, program windows, different folders, and files. These all live in what’s called the file system. Everything on your computer - programs, pictures, documents - lives somewhere in the file system. One way to think of the file system is the layer of stuff that can be activated to use use the CPU, memory and hard drive of your computer.
NOW, imagine you wanted to have a second computer. You don’t want to buy a whole new computer because it’s too expensive. What if, instead, you could have another filesystem that you could store and access from your main computer, but that is self-contained?
A container system (like Docker) is a special program on your computer that does this. The term “container” can be usefully considered with reference to shipping containers. Before shipping containers were developed, packing and unpacking cargo ships was time consuming, and error prone, with high potential for different clients’ goods to become mixed up. Software containers standardise the packaging of a complete software system: you can drop a container into a computer with the container software installed (also called a container host), and it should “just work”.
Virtualization
Containers are an example of what’s called virtualization – having a second “virtual” computer running and accessible from a main or host computer. Another example of virtualization are virtual machines or VMs. A virtual machine typically contains a whole copy of an operating system in addition to its own file system and has to get booted up in the same way a computer would. A container is considered a lightweight version of a virtual machine; underneath, the container is using the Linux kernel and simply has some flavor of Linux + the file system inside.
One final term: if the container is an alternative file system layer that you can access and run from your computer, the container image is like a template for that container. The container image has all the needed information to start up a running copy of the container. A running container tends to be transient and can be started and shut down. The image is more long-lived, as a source file for the container. You could think of the container image like a cookie cutter – it can be used to create multiple copies of the same shape (or container) and is relatively unchanging, where cookies come and go. If you want a different type of container (cookie) you need a different image (cookie cutter).
Putting the Pieces Together
Think back to some of the challenges we described at the beginning. The many layers of scientific software installations make it hard to install and re-install scientific software – which ultimately, hinders reliability and reproducibility.
But now, think about what a container is - a self-contained, complete, separate computer file system. What if you put your scientific software tools into a container?
This solves several of our problems:
- There is a clear record of what software and software dependencies were used, from bottom to top.
- The container can be used on any computer that has Docker installed – it doesn’t matter whether the computer is Mac, Windows or Linux-based.
- The container ensures that you can use the exact same software and environment on your computer and on other resources (like a large-scale computing cluster).
The rest of this workshop will show you how to download and run pre-existing containers on your own computer, and how to create and share your own containers.
Key Points
Almost all software depends on other software components to function, but these components have independent evolutionary paths.
Projects involving many software components can rapidly run into a combinatoric explosion in the number of software version configurations available, yet only a subset of possible configurations actually works as desired.
Containers collect software components together and can help avoid software dependency problems.
Virtualisation is an old technology that container technology makes more practical.
Docker is just one software platform that can create containers and the resources they use.
Introducing the Docker command line
Overview
Teaching: 10 min
Exercises: 0 minQuestions
How do I interact with Docker?
Objectives
Explain how to check that Docker is installed and is ready to use.
Demonstrate some initial Docker command line interactions.
Docker command line
Start the Docker application that you installed in working through the setup instructions for this session. Note that this might not be necessary if your laptop is running Linux or if the installation added the Docker application to your startup process.
You may need to login to Docker Hub
The Docker application will usually provide a way for you to log in to the Docker Hub using the application’s menu (macOS) or systray icon (Windows) and it is usually convenient to do this when the application starts. This will require you to use your Docker Hub username and your password. We will not actually require access to Dockerhub until later in the course but if you can login now, you should do so.
Determining your Docker Hub username
If you no longer recall your Docker Hub username, e.g., because you have been logging into the Docker Hub using your email address, you can find out what it is through the steps:
- Open http://hub.docker.com/ in a web browser window
- Sign-in using your email and password (don’t tell us what it is)
- In the top-right of the screen you will see your username
Once your Docker application is running, open a shell (terminal) window, and run the following command to check that Docker is installed and the command line tools are working correctly. I have appended the output that I see on my Mac, but the specific version is unlikely to matter much: it certainly does not have to precisely match mine.
$ docker --version
Docker version 19.03.5, build 633a0ea
The above command has not actually relied on the part of Docker that runs containers, just that Docker is installed and you can access it correctly from the command line.
A command that checks that Docker is working correctly is the docker container list command (we cover this command in more detail later in the course).
Without explaining the details, output on a newly installed system would likely be:
$ docker container ls
CONTAINER ID IMAGE COMMAND CREATED STATUS PORTS NAMES
(The command docker info will achieve a similar end but produces a larger amount of output.)
However, if you instead get a message similar to the following
Cannot connect to the Docker daemon at unix:///var/run/docker.sock. Is the docker daemon running?
then you need to check that you have started the Docker Desktop, Docker Engine, or however else you worked through the setup instructions.
Key Points
A toolbar icon indicates that Docker is ready to use.
You will typically interact with Docker using the command line.
Exploring and Running Containers
Overview
Teaching: 20 min
Exercises: 10 minQuestions
How do I interact with a Docker container on my computer?
Objectives
Use the correct command to see which Docker images are on your computer.
Download new Docker images.
Demonstrate how to start an instance of a container from an image.
Describe at least two ways to run commands inside a running Docker container.
Reminder of terminology: images and containers
Recall that a container “image” is the template from which particular instances of containers will be created.
Let’s explore our first Docker container. The Docker team provides a simple container
image online called hello-world. We’ll start with that one.
Downloading Docker images
The docker image command is used to list and modify Docker images.
You can find out what container images you have on your computer by using the following command (“ls” is short for “list”):
$ docker image ls
If you’ve just installed Docker, you won’t see any images listed.
To get a copy of the hello-world Docker image from the internet, run this command:
$ docker pull hello-world
You should see output like this:
Using default tag: latest
latest: Pulling from library/hello-world
1b930d010525: Pull complete
Digest: sha256:f9dfddf63636d84ef479d645ab5885156ae030f611a56f3a7ac7f2fdd86d7e4e
Status: Downloaded newer image for hello-world:latest
docker.io/library/hello-world:latest
DockerHub
Where did the
hello-worldimage come from? It came from the DockerHub website, which is a place to share Docker images with other people. More on that in a later episode.
Exercise: Check on Your Images
What command would you use to see if the
hello-worldDocker image had downloaded successfully and was on your computer? Give it a try before checking the solution.Solution
To see if the
hello-worldimage is now on your computer, run:$ docker image ls
Note that the downloaded hello-world image is not in the folder where you are in the terminal! (Run
ls by itself to check.) The image is not a file like our normal programs and files;
Docker stores it in a specific location that isn’t commonly accessed, so it’s necessary
to use the special docker image command to see what Docker images you have on your
computer.
Running the hello-world container
To create and run containers from named Docker images you use the docker run command. Try the following docker run invocation. Note that it does not matter what your current working directory is.
$ docker run hello-world
Hello from Docker!
This message shows that your installation appears to be working correctly.

To generate this message, Docker took the following steps:
 1. The Docker client contacted the Docker daemon.
 2. The Docker daemon pulled the "hello-world" image from the Docker Hub.
    (amd64)
 3. The Docker daemon created a new container from that image which runs the
    executable that produces the output you are currently reading.
 4. The Docker daemon streamed that output to the Docker client, which sent it
    to your terminal.

To try something more ambitious, you can run an Ubuntu container with:
 $ docker run -it ubuntu bash

Share images, automate workflows, and more with a free Docker ID:
 https://hub.docker.com/

For more examples and ideas, visit:
 https://docs.docker.com/get-started/
What just happened? When we use the docker run command, Docker does three things:
| 1. Starts a Running Container | 2. Performs Default Action | 3. Shuts Down the Container |
|---|---|---|
| starts a running container, based on the image. Think of this as the “alive” or”inflated” version of the container – it’s actually doing something | If the container has a default action set, it will perform that default action. This could be as simple as printing a message (as above) or running a whole analysis pipeline! | Once the default action is complete, the container stops running (or exits). The image is still there, but nothing is actively running. |
The hello-world container is set up to run an action by default -
namely to print this message.
Using
docker runto get the imageWe could have skipped the
docker pullstep; if you use thedocker runcommand and you don’t already have a copy of the Docker image, Docker will automatically pull the image first and then run it.
Running a container with a chosen command
But what if we wanted to do something different with the container? The output
just gave us a suggestion of what to do – let’s use a different Docker image
to explore what else we can do with the docker run command. The suggestion above
is to use ubuntu, but we’re going to run a different type of Linux, alpine
instead because it’s quicker to download.
Run the Alpine Docker container
Try downloading and running the
alpineDocker container. You can do it in two steps, or one. What are they?
What happened when you ran the Alpine Docker container?
$ docker run alpine
If you never used the alpine docker image on your computer, docker probably printed a message that it couldn’t find the image and had to download it. If you used the alpine image before, the command will probably show no output. That’s because this particular container is designed for you to provide commands yourself. Try running this instead:
$ docker run alpine cat /etc/os-release
You should see the output of the cat /etc/os-release command, which prints out
the version of Alpine Linux that this container is using and a few additional bits of information.
Hello World, Part 2
Can you run the container and make it print a “hello world” message?
Give it a try before checking the solution.
Solution
Use the same command as above, but with the
echocommand to print a message.$ docker run alpine echo 'Hello World'
So here, we see another option – we can provide commands at the end of the docker run
command and they will execute inside the running container.
Running containers interactively
In all the examples above, Docker has started the container, run a command, and then
immediately shut down the container. But what if we wanted to keep the container
running so we could log into it and test drive more commands? The way to
do this is by adding the interactive flag -it to the docker run command and
by providing a shell (usually bash or sh) as our command.
The alpine docker image doesn’t include bash so we need to use sh.
$ docker run -it alpine sh
Technically…
Technically, the interactive flag is just
-i, the extra-t(combined as-itabove) is an option that allows you to connect to a shell like bash. But since usually you want to have a command line when run interactively, it always makes sense to use the two together.
Your prompt should change significantly to look like this:
/ #
That’s because you’re now inside the running container! Try these commands:
pwdlswhoamiecho $PATHcat /etc/os-release
All of these are being run from inside the running container, so you’ll get information
about the container itself, instead of your computer. To finish using the container,
just type exit.
/ # exit
Practice Makes Perfect
Can you find out the version of Linux installed on the
busyboxcontainer? Can you find thebusyboxprogram? What does it do? (Hint: passing--helpto almost any command will give you more information.)Solution 1 - Interactive
Run the busybox container interactively – you can use
docker pullfirst, or just run it with this command:$ docker run -it busybox shThen try, running these commands
/# cat /proc/version
/# busybox --help
Exit when you’re done.
/# exitSolution 2 - Run commands
Run the busybox container, first with a command to read out the Linux version:
$ docker run busybox cat /proc/versionThen run the container again with a command to print out the busybox help:
$ docker run busybox busybox --help
Conclusion
So far, we’ve seen how to download Docker images, use them to run commands inside running containers, and even how to explore a running container from the inside. Next, we’ll take a closer look at all the different kinds of Docker images that are out there.
Key Points
The
docker pullcommand downloads Docker images from the internet.The
docker imagecommand lists Docker images that are (now) on your computer.The
docker runcommand creates running containers from images and can run commands inside them.When using the
docker runcommand, a container can run a default action (if it has one), a user specified action, or a shell to be used interactively.
Finding Containers on the Docker Hub
Overview
Teaching: 10 min
Exercises: 10 minQuestions
What is the Docker Hub, and why is it useful?
Objectives
Explain how the Docker Hub augments Docker use.
Explore the Docker Hub webpage for a popular Docker image.
Find the list of tags for a particular Docker image.
Identify the three components of a container’s identifier.
In the previous episode, we ran a few different containers: hello-world, alpine,
and maybe busybox. Where did these containers come from? The Docker Hub!
Introducing the Docker Hub
The Docker Hub is an online repository of container images, a vast number of which are publicly available. A large number of the images are curated by the developers of the software that they package. Also, many commonly used pieces of software that have been containerised into images are specifically endorsed, which means that you can trust the containers to have been checked for functionality, stability, and that they don’t contain malware.
Docker can be used without connecting to the Docker Hub
Note that while the Docker Hub is well integrated into Docker functionality, the Docker Hub is certainly not required for all types of use of Docker containers. For example, some organisations may run container infrastructure that is entirely disconnected from the Internet.
Exploring an Example Docker Hub Page
As an example of a Docker Hub page, let’s explore the page for the python language. The most basic form of containerised python is in the “python” image (which is endorsed by the Docker team). Open your web browser to https://hub.docker.com/_/python to see what is on a typical Docker hub software page.
The top-left provides information about the name, short description, popularity (i.e., over a million downloads in the case of this image), and endorsements.
The top-right provides the command to pull this image to your computer.
The main body of the page contains many used headings, such as:
- Which tags (i.e., image versions) are supported;
- Summary information about where to get help, which computer architectures are supported, etc.;
- A longer description of the package;
- Examples of how to use the image; and
- The licence that applies.
At least in my experience, the “Examples of how to use the image” section of most images’ pages will provide examples that are likely to adequately cover your intended use of the image.
Exploring Image Versions
A single Docker Hub page can have many different versions of container images,
based on the version of the software inside. These
versions are indicated by “tags”. When referring to the specific version of a container
by its tag, you use a colon, :, like this:
CONTAINERNAME:TAG
So if I wanted to download the python container, with Python 3.8, I would use this name:
$ docker pull python:3.8
But if I wanted to download a Python 3.6 container, I would use this name:
$ docker pull python:3.6
The default tag (which is used if you don’t specify one) is called latest.
So far, we’ve only seen containers that are maintained by the Docker team. However, it’s equally common to use containers that have been produced by individual owners or organizations. Containers that you create and upload to Docker Hub would fall into this category, as would the containers maintained by organizations like ContinuumIO (the folks who develop the Anaconda Python environment) or community groups like rocker, a group that builds community R containers.
The name for these group- or individually-managed containers have this format:
OWNER/CONTAINERNAME:TAG
Repositories
The technical name for the contents of a Docker Hub page is a “repository.” The tag indicates the specific version of the container image that you’d like to use from a particular repository. So a slightly more accurate version of the above example is:
OWNER/REPOSITORY:TAG
What’s in a name?
How would I download the Docker container produced by the
rockergroup that has version 3.6.1 of R and the tidyverse installed?Solution
First, search for
rockerin Docker Hub. Then look for theirtidyverseimage. You can look at the list of tags, or just guess that the tag is3.6.1. Altogether, that means that the name of the container we want to download is:$ docker pull rocker/tidyverse:3.6.1
Many Different Containers
There are many different containers on Docker Hub. This is where the real advantage of using containers shows up – each container represents a complete software installation that you can use and access without any extra work!
The easiest way to find containers is to search on Docker Hub, but sometimes software pages have a link to their containers from their home page.
What container is right for you?
Find a Docker container that’s relevant to you. If you’re unsuccessful in your search, or don’t know what to look for, you can use the R or Python containers we’ve already seen.
Once you find a container, use the skills from the previous episode to download the image and explore it.
Key Points
The Docker Hub is an online repository of container images.
Many Docker Hub images are public, and may be officially endorsed.
Each Docker Hub page about an image provides structured information and subheadings
Most Docker Hub pages about images contain sections that provide examples of how to use those images.
Many Docker Hub images have multiple versions, indicated by tags.
The naming convention for Docker containers is:
OWNER/CONTAINER:TAG
Cleaning Up Containers
Overview
Teaching: 10 min
Exercises: 0 minQuestions
How do I interact with a Docker container on my computer?
Objectives
Explain how to list running and completed containers.
Removing images
The images and their corresponding containers can start to take up a lot of disk space if you don’t clean them up occasionally, so it’s a good idea to periodically remove container images that you won’t be using anymore.
In order to remove a specific image, you need to find out details about the image, specifically, the “image ID”. For example say my laptop contained the following image.
$ docker image ls
REPOSITORY       TAG         IMAGE ID       CREATED          SIZE
hello-world      latest      fce289e99eb9   15 months ago    1.84kB
You can remove the image with a docker image rm command that includes the image ID, such as:
$ docker image rm fce289e99eb9
or use the image name, like so:
$ docker image rm hello-world
However, you may see this output:
Error response from daemon: conflict: unable to remove repository reference "hello-world" (must force) - container e7d3b76b00f4 is using its referenced image fce289e99eb9
This happens when Docker hasn’t cleaned up some of the times when a container has been actually run. So before removing the container image, we need to be able to see what containers are currently running, or have been run recently, and how to remove these.
What containers are running?
Working with containers, we are going to shift to a new docker command: docker container. Similar to docker image, we can list running containers by typing:
$ docker container ls
CONTAINER ID IMAGE COMMAND CREATED STATUS PORTS NAMES
Notice that this command didn’t return any containers because our containers all exited and thus stopped running after they completed their work.
docker psThe command
docker psserves the same purpose asdocker container ls, and comes from the Unix shell commandpswhich describes running processes.
What containers have run recently?
There is also a way to list running containers, and those that have completed recently, which is to add the --all/-a flag to the docker container ls command as shown below.
$ docker container ls --all
CONTAINER ID        IMAGE               COMMAND             CREATED             STATUS                     PORTS               NAMES
9c698655416a        hello-world         "/hello"            2 minutes ago       Exited (0) 2 minutes ago                       zen_dubinsky
6dd822cf6ca9        hello-world         "/hello"            3 minutes ago       Exited (0) 3 minutes ago                       eager_engelbart
Keeping it clean
You might be surprised at the number of containers Docker is still keeping track of. One way to prevent this from happening is to add the
--rmflag todocker run. This will completely wipe out the record of the run container when it exits. If you need a reference to the running container for any reason, don’t use this flag.
How do I remove an exited container?
To delete an exited container you can run the following command, inserting the CONTAINER ID for the container you wish to remove.
It will repeat the CONTAINER ID back to you, if successful.
$ docker container rm 9c698655416a
9c698655416a
If you want to remove all exited containers at once you can use the docker containers prune command.
Be careful with this command.
If you have containers you may want to reconnect to, you should not use this command.
It will ask you if to confirm you want to remove these containers, see output below.
If successfull it will print the full CONTAINER ID back to you.
$ docker container prune
WARNING! This will remove all stopped containers.
Are you sure you want to continue? [y/N] y
Deleted Containers:
9c698655416a848278d16bb1352b97e72b7ea85884bff8f106877afe0210acfc
6dd822cf6ca92f3040eaecbd26ad2af63595f30bb7e7a20eacf4554f6ccc9b2b
Removing images, for real this time
Now that we’ve removed any potentially running or stopped containers, we can try again to
delete the hello-world image.
$ docker image rm hello-world
Untagged: hello-world:latest
Untagged: hello-world@sha256:5f179596a7335398b805f036f7e8561b6f0e32cd30a32f5e19d17a3cda6cc33d
Deleted: sha256:fce289e99eb9bca977dae136fbe2a82b6b7d4c372474c9235adc1741675f587e
Deleted: sha256:af0b15c8625bb1938f1d7b17081031f649fd14e6b233688eea3c5483994a66a3
The reason that there are a few lines of output, is that a given image may have been formed by merging multiple underlying layers.
Any layers that are used by multiple Docker images will only be stored once.
Now the result of docker image ls should no longer include the hello-world image.
Key Points
The
docker containercommand lists containers that have been created.
Creating your own container images
Overview
Teaching: 20 min
Exercises: 15 minQuestions
How can I make my own Docker images?
Objectives
Explain the purpose of a
Dockerfileand show some simple examples.Demonstrate how to build a Docker image from a
Dockerfile.Compare the steps of creating a container interactively versus a
Dockerfile.Create an installation strategy for a container
Demonstrate how to upload (‘push’) your container images to the Docker Hub.
Describe the significance of the Docker Hub naming scheme.
There are lots of reasons why you might want to create your own Docker image.
- You can’t find a container with all the tools you need on Docker Hub.
- You want to have a container to “archive” all the specific software versions you ran for a project
- You want to share your workflow with someone else.
Interactive installation
Before creating a reproducible installation, let’s experiment with installing
software inside a container. Start the alpine container from before, interactively:
$ docker run -it alpine sh
Because this is a basic container, there’s a lot of things not installed – for
example, python3.
/# python3
sh: python3: not found
Inside the container, we can run commands to install Python3. The Alpine version of
Linux has a installation tool called apk that we can use to install Python3.
/# apk add --update python3 py3-pip python3-dev
We can test our installation by running a Python command:
/# python3 --version
Once Python is installed, we can add Python packages using the pip package installer:
/# pip install cython
Exercise: Searching for Help
Can you find instructions for installing R on Alpine Linux? Do they work?
Solution
A quick search should hopefully show that the way to install R on Alpine Linux is:
/# apk add R
Once we exit, these changes are not saved to a new container by default. There is
a command that will “snapshot” our changes, but building containers this way is
not very reproducible. Instead, we’re going to take what we’ve learned from this
interactive installation and create our container from a reproducible recipe,
known as a Dockerfile.
If you haven’t already, exit out of the interactively running container.
/# exit
Put installation instructions in a Dockerfile
A Dockerfile is a plain text file with keywords and commands that
can be used to create a new container image.
From your shell, go to the folder you downloaded at the start of the lesson and print out the Dockerfile inside:
$ cd ~/Desktop/docker-intro/basic
$ cat Dockerfile
FROM <EXISTING IMAGE>
RUN <INSTALL CMDS FROM SHELL>
RUN <INSTALL CMDS FROM SHELL>
CMD <CMD TO RUN BY DEFAULT>
Let’s break this file down:
- The first line,
FROM, indicates which container we’re starting with. - The next two lines
RUN, will indicate installation commands we want to run. These are the same commands that we used interactively above. - The last line,
CMD, indicates the default command we want the container to run, if no other command is provided. It is recommended to provideCMDin exec-form (see theCMDsection of the Dockerfile documentation for more details). It is written as a list which contains the executable to run as its first element, optionally followed by any arguments as subsequent elements. The list is enclosed in square brackets ([]) and its elements are double-quoted (") strings which are separated by commas. For example:CMD ["ls", "-lF", "--color", "/etc"]
shell-form and exec-form for CMD
Another way to specify the parameter for the
CMDinstruction is the shell-form. Here you type the command as you would call it from the command line. Docker then silently runs this command in the image’s standard shell.CMD cat /etc/passwdis equivalent toCMD ["/bin/sh", "-c", "cat /etc/passwd"]. We recommend to prefer the more explicit exec-form because we will be able to create more flexible container command options and make sure complex commands are unambiguous in this format.
Exercise: Take a Guess
Do you have any ideas about what we should use to fill in the sample Dockerfile to replicate the installation we did above?
Solution:
Based on our experience above, edit the
Dockerfile(in your text editor of choice) to look like this:FROM alpine RUN apk add --update python3 py3-pip python3-dev RUN pip install cython CMD ["python3", "--version"]
The recipe provided by this Dockerfile will use Alpine Linux as the base container, add Python and the Cython library, and set a default print command.
Create a new Docker image
So far, we just have a file. We want Docker to take this file,
run the install commands inside, and then save the
resulting container as a new container image. To do this we will use the
docker build command.
We have to provide docker build with two pieces of information:
- the location of the
Dockerfile - the name of the new image. Remember the naming scheme from before? You should name
your new image with your Docker Hub username and a name for the container, like this:
USERNAME/CONTAINERNAMEAll together, the build command will look like this:
$ docker build -t USERNAME/CONTAINERNAME .
The -t option names the container; the final dot indicates that the Dockerfile is in
our current directory.
For example, if my user name was alice and I wanted to call my
image alpine-python, I would use this command:
$ docker build -t alice/alpine-python .
Exercise: Review!
Think back to earlier. What command can you run to check if your image was created successfully? (Hint: what command shows the images on your computer?)
We didn’t specify a tag for our image name. What did Docker automatically use?
What command will run the container you’ve created? What should happen by default if you run the container? Can you make it do something different, like print “hello world”?
Solution
To see your new image, run
docker image ls. You should see the name of your new image under the “REPOSITORY” heading.In the output of
docker image ls, you can see that Docker has automatically used thelatesttag for our new image.We want to use
docker runto run the container.$ docker run alice/alpine-pythonshould run the container and print out our default message, the version of Python.
$ docker run alice/alpine-python echo "Hello World"will run the container and print out “Hello world” instead.
While it may not look like you have achieved much, you have already effected the combination of a lightweight Linux operating system with your specification to run a given command that can operate reliably on macOS, Microsoft Windows, Linux and on the cloud!
Boring but important notes about installation
There are a lot of choices when it comes to installing software - sometimes too many! Here are some things to consider when creating your own container:
- Start smart, or, don’t install everything from scratch! If you’re using Python as your main tool, start with a Python container. Same with R. We’ve used Alpine Linux as an example in this lesson, but it’s generally not a good container to start with because it is a less common version of Linux; using Ubuntu, Debian and CentOS are all good options for scientific software installations. The program you’re using might recommend a particular version of Linux; if this happens, start with that particular Linux container.
- How big? How much software do you really need to install? When you have a choice, lean towards using smaller starting images and installing only what’s needed for your software, as a bigger image means longer download times to use.
- Know (or Google) your Linux. Each version of Linux has a special set of tools specifically for installing software. The
apkcommand we used above is the installer for Alpine Linux. The installers for various common Linux versions are listed below:- Ubuntu:
aptorapt-get - Debian:
deb - CentOS:
yumMost common software installations are available to be installed via these tools. Searching for “install X on Y Linux” is always a good start for common software installations; if something isn’t available via the Linux distribution’s installation tools, try the options below.
- Ubuntu:
- Use what you know. You’ve probably used commands like
piporinstall.packages()before on your own computer – these will also work to install things in containers (if the basic scripting language is installed). - README. Many scientific software tools have a README or installation instructions that lay out how to install software. You want to look for instructions for Linux. If the install instructions include options like those suggested above, try those first.
In general, a good strategy for installing software is:
- Make a list of what you want to install.
- Look for pre-existing containers.
- Read through instructions for software you’ll need to install.
- Try installing everything interactively in your base container - take notes!
- From your interactive installation, create a Dockerfile and then try to build the container again from that.
TODO: Exercises
Have a set of “choose your own adventure” software installation examples
Share your new container on Docker Hub
Images that you release publicly can be stored on the Docker Hub for free. If you
name your image as described above, with your Docker Hub username, all you need to do
is run the opposite of docker pull – docker push.
$ docker push alice/alpine-python
Make sure to substitute the full name of your container!
In a web browser, open https://hub.docker.com, and on your user page you should now see your container listed, for anyone to use or build on.
Logging In
Technically, you have to be logged into Docker on your computer for this to work. Usually it happens by default, but if
docker pushdoesn’t work for you, rundocker loginfirst, enter your Docker Hub username and password, and then trydocker pushagain.
What’s in a name? (again)
You don’t have to name your containers using the USERNAME/CONTAINER:TAG naming> scheme. On your own computer, you can call containers whatever you want and refer to
them by the names you choose. It’s only when you want to share a container that it
needs the correct naming format.
You can rename images using the docker tag command. For example, imagine someone
named Alice has been working on a workflow container and called it workflow-test
on her own computer. She now wants to share it in her alice Docker Hub account
with the name workflow-complete and a tag of v1. Her docker tag command
would look like this:
$ docker tag workflow-test alice/workflow-complete:v1
She could then push the re-named container to Docker Hub,
using docker push alice/workflow-complete:v1
Key Points
Dockerfilesspecify what is within Docker images.The
docker buildcommand is used to build an image from aDockerfileYou can share your Docker images through the Docker Hub so that others can create Docker containers from your images.
Creating More Complex Container Images
Overview
Teaching: 30 min
Exercises: 30 minQuestions
How can I make more complex container images?
Objectives
Explain how you can include files within Docker images when you build them.
Explain how you can access files on the Docker host from your Docker containers.
In order to create and use your own containers, you may need more information than our previous example. You may want to use files from outside the container, copy those files into the container, and just generally learn a little bit about software installation. This episode will cover these. Note that the examples will get gradually more and more complex - most day-to-day use of containers can be accomplished using the first 1-2 sections on this page.
Using scripts and files from outside the container
In your shell, change to the sum folder in the docker-intro folder and look at
the files inside.
$ cd ~/Desktop/docker-intro/sum
$ ls
This folder has both a Dockerfile and a python script called sum.py. Let’s say
we wanted to try running the script using our recently created alpine-python
container.
Running containers
What command would we use to run python from the
alpine-pythoncontainer?
If we try running the container and Python script, what happens?
$ docker run alice/alpine-python python3 sum.py
python3: can't open file 'sum.py': [Errno 2] No such file or directory
No such file or directory
What does the error message mean? Why might the Python inside the container not be able to find or open our script?
The problem here is that the container and its file system is separate from our host computer’s file system. When the container runs, it can’t see anything outside itself, including any of the files on our computer. In order to use Python (inside the container) and our script (outside the container, on our computer), we need to create a link between the directory on our computer and the container.
This link is called a “mount” and is what happens automatically when a USB drive or other external hard drive gets connected to a computer - you can see the contents appear as if they were on your computer.
We can create a mount between our computer and the running container by using an additional
option to docker run. We’ll also use the variable $PWD which will substitute
in our current working directory. The option will look like this
-v $PWD:/temp
What this means is – link my current directory with the container, and inside the
container, name the directory /temp
Let’s try running the command now:
$ docker run -v $PWD:/temp alice/alpine-python python3 sum.py
But we get the same error!
python3: can't open file 'sum.py': [Errno 2] No such file or directory
This final piece is a bit tricky – we really have to remember to put ourselves
inside the container. Where is the sum.py file? It’s in the directory that’s been
mapped to /temp – so we need to include that in the path to the script. This
command should give us what we need:
$ docker run -v $PWD:/temp alice/alpine-python python3 /temp/sum.py
Note that if we create any files in the /temp directory while the container is
running, these files will appear on our host filesystem in the original directory
and will stay there even when the container stops.
Exercise: Explore the script
What happens if you use the
docker runcommand above and put numbers after the script name?Solution
This script comes from the Python Wiki > > and is set to add all numbers that are passed to it as arguments.
Exercise: Checking the options
Our Docker command has gotten much longer! Can you go through each piece of the Docker command above the explain what it does? How would you characterize the key components of a Docker command?
Solution
Here’s a breakdown of each piece of the command above
docker run: use Docker to run a container-v $PWD:/temp: connect my current working directory ($PWD) as a folder inside the container called/tempalice/alpine-python: name of the container to runpython3 /temp/sum.py: what commands to run in the containerMore generally, every Docker command will have the form: `docker [action] [docker options] [docker image] [command to run inside]
Exercise: Interactive jobs
Try using the directory mount option but run the container interactively. Can you find the folder that’s connected to your computer? What’s inside?
Solution
The docker command to run the container interactively is:
$ docker run -v $PWD:/temp -it alice/alpine-python shOnce inside, you should be able to navigate to the
/tempfolder and see that’s contents are the same as the files on your computer:/# cd /temp /# ls
Mounting a folder can be very useful when you want to run the software inside your container on many different input files. In other situations, you may want to save or archive an authoritative version of your data by adding it to the container permanently. That’s what we will cover next.
Including personal scripts and data in a container
Our next project will be to add our own files to a container - something you
might want to do if you’re sharing a finished analysis or just want to have
an archived copy of your entire analysis including the data. Let’s assume that we’ve finished with our sum.py
script and want to add it to the container itself.
In your shell, you should still be in the sum folder in the docker-intro folder.
$ pwd
$ /Users/yourname/Desktop/docker-intro/sum
Take a look at the Dockerfile. It looks similar to the one we used before, but
it has an additional line with the COPY keyword.
COPY sum.py /home
This line will cause Docker to copy the file from your computer into the container’s file system. Let’s build the container like before, but give it a different name:
$ docker build -t alice/alpine-sum .
Exercise: Did it work?
Can you remember how to run a container interactively? Try that with this one. Once inside, try running the Python script.
Solution
You can start the container interactively like so:
$ docker run -it alice/alpine-sum shYou should be able to run the python command inside the container like this:
/# python3 /home/sum.py
This COPY keyword can be used to place your own scripts or own data into a container
that you want to publish or use as a record. Note that it’s not necessarily a good idea
to put your scripts inside the container if you’re constantly changing or editing them.
Then, referencing the scripts from outside the container is a good idea, as we
did in the previous section. You also want to think carefully about size – if you
run docker image ls you’ll see the size of each image all the way on the right of
the screen. The bigger your image becomes, the harder it will be to easily download.
Copying alternatives
Another trick for getting your own files into a container is by using the
RUNkeyword and downloading the files from the internet. For example, if your code is in a GitHub repository, you could include this statement in your Dockerfile to download the latest version every time you build the container:RUN git clone https://github.com/alice/mycodeSimilarly, the
wgetcommand can be used to download any file publicly available on the internet:RUN wget ftp://ftp.ncbi.nlm.nih.gov/blast/executables/blast+/2.10.0/ncbi-blast-2.10.0+-x64-linux.tar.gz
More fancy Dockerfile options (optional, for presentation or as exercises)
We can expand on the example above to make our container even more “automatic”. Here are some ideas:
Make the sum.py script run automatically
FROM alpine

COPY sum.py /home
RUN apk add --update python3 py3-pip python3-dev

# Run the sum.py script as the default command
CMD ["python3", "/home/sum.py"]
Build and test it:
$ docker build -t alpine-sum:v1 .
$ docker run alpine-sum:v1
You’ll notice that you can run the container without arguments just fine,
resulting in sum = 0, but this is boring. Supplying arguments however
doesn’t work:
docker run alpine-sum:v1 10 11 12
results in
docker: Error response from daemon: OCI runtime create failed:
container_linux.go:349: starting container process caused "exec:
\"10\": executable file not found in $PATH": unknown.
This is because the arguments 10 11 12 are interpreted as a
command that replaces the default command given by CMD
["python3", "/home/sum.py"] in the image.
To achieve the goal of having a command that always runs when the
container is run and can be passed the arguments given on the
command line, use the keyword ENTRYPOINT in the Dockerfile.
FROM alpine

COPY sum.py /home
RUN apk add --update python3 py3-pip python3-dev

# Run the sum.py script as the default command and
# allow people to enter arguments for it
ENTRYPOINT ["python3", "/home/sum.py"]

# Give default arguments, in case none are supplied on
# the command-line
CMD ["10", "11"]
Build and test it:
$ docker build -t alpine-sum:v2 .
# Most of the time you are interested in the sum of 10 and 11:
$ docker run alpine-sum:v2
# Sometimes you have more challenging calculations to do:
$ docker run alpine-sum:v2 12 13 14
Overriding the ENTRYPOINT
Sometimes you don’t want to run the image’s
ENTRYPOINT. For example if you have a specialized image that does only sums, but you need an interactive shell to examine the container:$ docker run -ti alpine-sum:v2 /bin/shwill yield
Please supply integer argumentsYou need to override the
ENTRYPOINT-statement in the image like so:$ docker run -ti --entrypoint /bin/sh alpine-sum:v2
Add the sum.py script to the PATH so you can run it directly:
FROM alpine

COPY sum.py /home
# set script permissions
RUN chmod +x /home/sum.py
# add /home folder to the PATH
ENV PATH /home:$PATH

RUN apk add --update python3 py3-pip python3-dev
Build and test it:
$ docker build -t alpine-sum:v3 .
$ docker run alpine-sum:v3 sum.py 1 2 3 4
Key Points
You can include files from your Docker host into your Docker images by using the
COPYinstruction in yourDockerfile.Docker allows containers to read and write files from the Docker host.
Creating containers in the cloud
Overview
Teaching: 20 min
Exercises: 0 minQuestions
How can I create Docker containers in the cloud?
Objectives
Demonstrate how to effect creation of a container from the Docker image in the cloud.
Gain an initial experience of the container functionality provided by Google Cloud’s Compute Engine.
Creating Containers on Cloud Platforms
There are lots of ways containers can be run on cloud computing platforms (a.k.a., “in the cloud”). Most commercial cloud providers now offer a container hosting service that will connect to the Docker Hub (and their own container registries) in order to fetch the container images that you specify, and charge for the time and resources that the containers use.
Free and Introductory Offer Container Hosting Options
Please note these options can be constantly changing, check with the Cloud providers webpage for the latest details. Beware that many of the free trials require you to give payment information and you will be billed at the end of the trial or if you exceed the free trial limits. Many of the cloud providers offer charge limit options, set these to ensure you don’t get an sudden large bill.
Educational Credits
For this lesson (run by AIMLAC CDT, January 2021) we have received free credit from Google for $50 per student, you will not need to register a credit card to use this. You will have each been emailed a link to activate this.
Running a container in the cloud, using your Google account
Setting up your account
- Click the link you’ve been sent to activate your Google Cloud credit. This should create a billing account using the credit you’ve been given.
- Open a web browser window and visit https://console.cloud.google.com/.
- Log into your Google account if required.
- Create a new project called AIMLAC and link it to the billing account you just created. Be especially careful if you already use Google Cloud personally that you are billing the right account.
Creating a virtual machine
- Click on the grill menu, Compute Engine, VM Instances
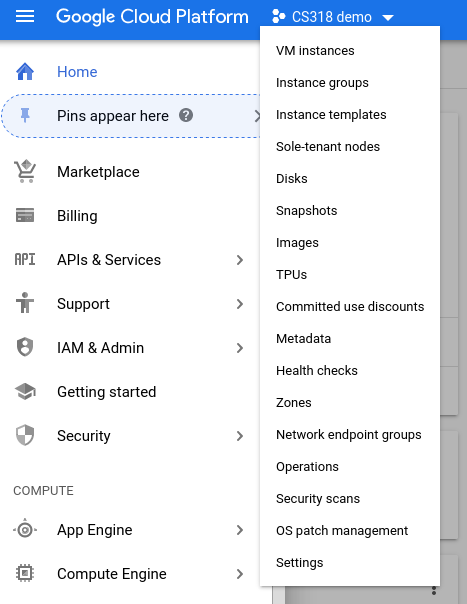
- Click on “Create Instance” on the page showing the list of current instances.
- Give your VM a name, as we won’t need much processing power choose f1-micro as the Machine type by selecting the N1 Series.
- Change the operating system to the Container Optimised OS

SSH into your container from the Google Cloud Console
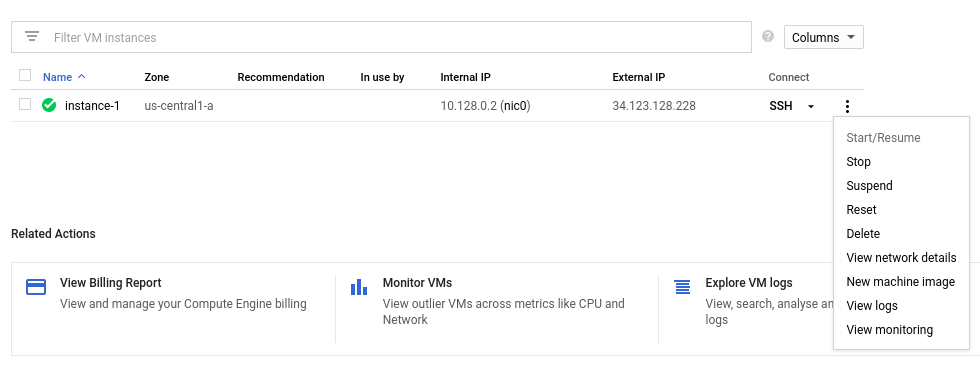
- Click on the SSH option under the connect column in the VM Instances page and choose “Open in browser Window.”
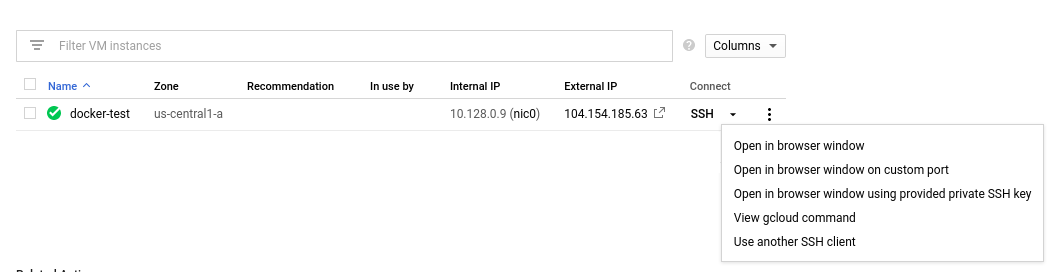
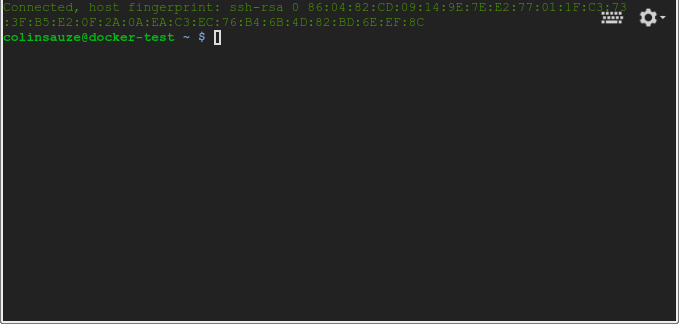
- From here you can run docker commands and launch the container as you’ve previously done by typing:
$ docker run -it alice/alpine-python
When using the docker run command (as you have done previously), the container takes some default actions after being created, which are specified in your Dockerfile (e.g., the CMD line).
SSH into your container from your computer’s SSH client
If you want to SSH into your Google Cloud virtual machine from your computer’s SSH client instead of the web interface you’ll need to generate an SSH key and add it to the virtual machine.
If you’ve never done this before generate an SSH key with the ssh-keygen command in your terminal.
$ ssh-keygen
This will create two files in the .ssh directory inside your home directory. One called id_rsa and the other id_rsa.pub. These form the public and private halves of an encryption key, you need to place the public half on any systems you want to login to. Display the contents of the id_rsa.pub file and copy it to the clipboard. Then from the Compute Engine VM Instances page do the following:
- Click on the instance name
- Click edit on the top of the screen
- Scroll down to the bottom of the page and find the “SSH keys” section, it will say “You have 0 SSH keys”.
- Click on the “Show and edit” link.
- Paste in your public key into the box saying “Enter public SSH key”
- Scroll down and click Save
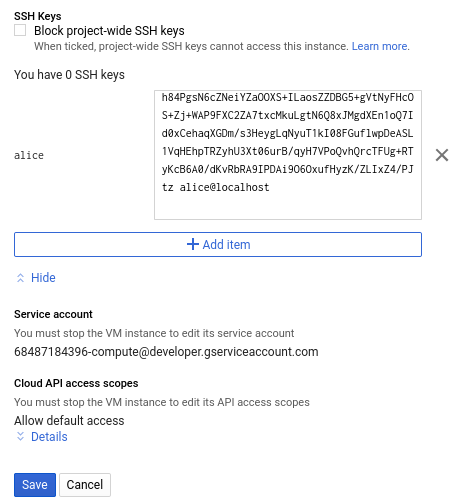
- Return to the VM Instances page
- Note the external IP address of your virtual machine (104.154.185.63 in the screenshot above, your’s will be something different)
- Open a terminal and type ssh followed by a space and the external IP address.
- You should be logged in automatically to your virtual machine without being asked for a password.
- Note that your username will be the same as the username which you use on your computer and which was specified in the key file.
Destroying your virtual machine
- From the VM Instances page click the 3 vertical dots at the end of line for your VM.
- Choose “Delete”
- Confirm the deletion
- Your VM and any associated disks will be deleted
Running a web server container from Google Cloud
Now lets create a new Dockerfile which defines a container based on the nginx webserver. Create a directory called docker-webserver-example and cd into it.
mkdir docker-webserver-example
cd docker-webserver-example
Open up a text editor for a new Dockerfile and type/paste in the following:
FROM nginx
MAINTAINER your@email.address

COPY startup.sh /

RUN apt update
RUN apt -y install procps
RUN chmod 777 /startup.sh

#expose the web server port to outside the container
EXPOSE 80/tcp

ENTRYPOINT ["bash","/startup.sh"]
In the same directory create another file and call it startup.sh and type/paste in the following code. This code will start the nginx web server and then every second it will update index.html (the default webpage) with the current time and a random number.
#!/bin/bash
nginx
#loop forever
while [ "0" = "0" ] ; do
time=$(date +%H:%M:%S)
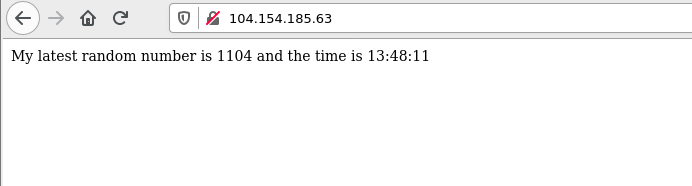
echo "My latest random number is $RANDOM and the time is $time" > /usr/share/nginx/html/index.html
sleep 1
done
Now build the container we’ve just specified
docker build -t alice/docker-webserver-example .
Now lets push it to Docker Hub:
docker push alice/docker-webserver-example
Go back to the Cloud console’s VM Instances page and do the following:
- Click on “Create Instance” on the page showing the list of current instances.
- Give your VM a name, as we won’t need much processing power choose f1-micro as the Machine type by selecting the N1 Series.
- Tick the option “Deploy a container image to this VM instance”.
- Enter the path to container on Docker Hub which runs a webserver (in this case alice/docker-webserver-example) in the “Container image” box.
- Scrolldown and tick “Allow HTTP traffic” at the bottom of the page under Firewall
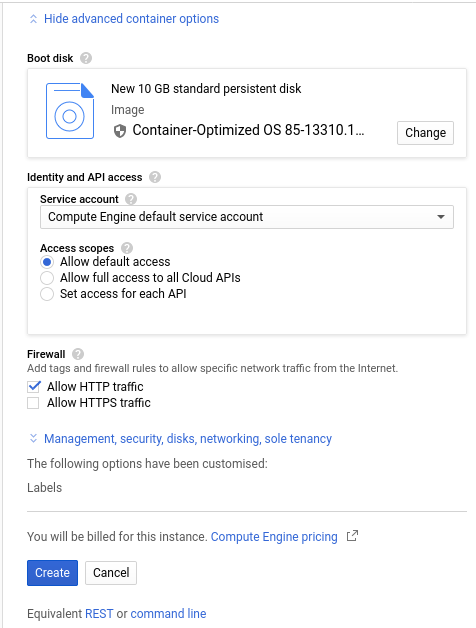
-
Click create
-
Go back to the VM Instances page in the Google Cloud Console and click on the link to the external IP address (104.154.185.63 in this example) or type this address into a new tab/window of your web browser.
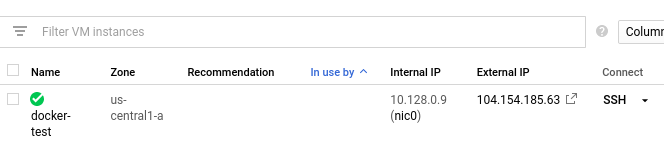
- You should see a webpage giving the time and a random number.
- Don’t forget to delete the instance when you are done with it.
Key Points
You can create Docker containers on cloud computing resources just using a web browser.
Google Cloud’s Compute Engine is an online repository storage service that can create Docker containers to perform computation on demand.
Containers used in generating this lesson
Overview
Teaching: 20 min
Exercises: 0 minQuestions
How can containers be useful to me for building websites?
Objectives
Demonstrate how to construct a website using containers to transform a specification into a fully-presented website.
The website for this lesson is generated mechanically, based on a set of files that specify the configuration of the site, its presentation template, and the content to go on this page. This is far more manageable than editing each webpage of the lesson separately, for example, if the page header needs to change, this change can be made in one place, and all the pages regenerated. The alternative would be needing to edit each page to repeat the change: this is not productive or suitable work for humans to do!
In your shell window, in your docker-intro create a new directory build-website and cd into it. We will later be expanding a ZIP file into this directory later.
Now open a web browser window and:
- Navigate to the GitHub repository that contains the files for this session, at https://github.com/carpentries-incubator/docker-introduction/;
- Click the green “Clone or download” button on the right-hand side of the page;
- Click “Download ZIP”.
- The downloaded ZIP file should contain one directory named
docker-introduction-gh-pages. - Move the
docker-introduction-gh-pagesfolder into thebuild-websitefolder you created above.
There are many ways to work with ZIP files
Note that the last two steps can be achieved using a Mac or Windows graphical user interface. There are also ways to effect expanding the ZIP archive on the command line, for example, on my Mac I can achieve the effect of those last two steps through running the command
unzip ~/Downloads/docker-introduction-gh-pages.zip.
In your shell window, if you cd into the docker-introduction-gh-pages folder and list the files, you should see something similar to what I see:
$ cd docker-introduction-gh-pages
$ ls
AUTHORS			_episodes		code
CITATION		_episodes_rmd		data
CODE_OF_CONDUCT.md	_extras			fig
CONTRIBUTING.md		_includes		files
LICENSE.md		_layouts		index.md
Makefile		aio.md			reference.md
README.md		assets			setup.md
_config.yml		bin
You can now request that a container is created that will compile the files in this set into the lesson website, and will run a simple webserver to allow you to view your version of the website locally. Note that this command will be long and fiddly to type, so you probably want to copy-and-paste it into your shell window. This command will continue to (re-)generate and serve up your version of the lesson website, so you will not get your shell prompt back until you type control+c. This will stop the webserver, since it cleans away the container.
If you happen to have the
maketool already installed…We are taking an atypical approach in using the command that follows, since you are not required to have set up the
maketool on your computer. However you may want to see whether you happen to havemakeinstalled anyway, by typingmake docker-serveinstead of the command below. At worst, this will fail and you can use the command shown below.
For macOS, Linux and PowerShell:
$ docker run --rm -it -v ${PWD}:/srv/jekyll -p 127.0.0.1:4000:4000 jekyll/jekyll:3.7.3 make serve
For cmd.exe shells on Microsoft Windows:
> docker run --rm -it -v "%CD%":/srv/jekyll -p 127.0.0.1:4000:4000 jekyll/jekyll:3.7.3 make serve
When I ran the macOS command, the output was as follows:
Unable to find image 'jekyll/jekyll:3.7.3' locally
3.7.3: Pulling from jekyll/jekyll
ff3a5c916c92: Pull complete
8e2da6035957: Pull complete
42e99ed6de92: Pull complete
70c638bbd0d9: Pull complete
8f8df9937b34: Pull complete
Digest: sha256:2b907c5f836ee66d6dde39aa021eebadcadd59dffab693ceecb73be7cfa2808b
Status: Downloaded newer image for jekyll/jekyll:3.7.3
jekyll serve
ruby 2.5.1p57 (2018-03-29 revision 63029) [x86_64-linux-musl]
Configuration file: /srv/jekyll/_config.yml
            Source: /srv/jekyll
       Destination: /srv/jekyll/_site
 Incremental build: disabled. Enable with --incremental
      Generating...
                    done in 2.647 seconds.
 Auto-regeneration: enabled for '/srv/jekyll'
    Server address: http://0.0.0.0:4000
  Server running... press ctrl-c to stop.
[2019-02-07 15:37:35] ERROR `/assets/favicons/favicon-96x96.png' not found.
[2019-02-07 15:37:35] ERROR `/assets/favicons/favicon-196x196.png' not found.
[2019-02-07 15:37:35] ERROR `/assets/favicons/favicon-16x16.png' not found.
[2019-02-07 15:37:35] ERROR `/assets/favicons/favicon-128.png' not found.
[2019-02-07 15:37:35] ERROR `/assets/favicons/favicon-32x32.png' not found.
In the preceding output, you see Docker downloading the image for Jekyll, which is a tool for building websites from specification files such as those used for this lesson. The line jekyll serve indicates a command that runs within the Docker container instance. The output below that is from the Jekyll tool itself, highlighting that the website has been built, and indicating that there is a server running.
Open a web browser window and visit the address http://localhost:4000/. You should see a site that looks very similar to that at https://carpentries-incubator.github.io/docker-introduction/.
Using a new shell window, or using your laptop’s GUI, locate the file index.md within the docker-introduction-gh-pages directory, and open it in your preferred editor program.
Near the top of this file you should see the description starting “This session aims to introduce the use of Docker containers with the goal of using them to effect reproducible computational environments.” Make a change to this message, and save the file.
If you reload your web browser, the change that you just made should be visible. This is because the Jekyll container saw that you changed the index.md file, and regenerated the website.
You can stop the Jekyll container by clicking in its terminal window and typing control+c.
You have now achieved using a reproducible computational environment to reproduce a lesson about reproducible computing environments.
Key Points
The generation of this lesson website can be effected using a container.
Containers in research workflows: reproducibility and granularity
Overview
Teaching: 20 min
Exercises: 0 minQuestions
How can I use container images to make my research more reproducible?
How do I incorporate containers into my research workflow?
What are container orchestration tools and how can they potentially help me?
Objectives
Understand how container images can help make research more reproducible.
Understand what practical steps I can take to improve the reproducibility of my research using containers.
Know that container orchestration tools are and what they can do
Although this workshop is titled “Reproducible computational environments using containers”, so far we have mostly covered the mechanics of using Docker with only passing reference to the reproducibility aspects. In this section, we discuss these aspects in more detail.
Work in progress…
Note that reproducibility aspects of software and containers are an active area of research, discussion and development so are subject to many changes. We will present some ideas and approaches here but best practices will likely evolve in the near future.
Reproducibility
By reproducibility here we mean the ability of someone else (or your future self) being able to reproduce what you did computationally at a particular time (be this in research, analysis or something else) as closely as possible even if they do not have access to exactly the same hardware resources # that you had when you did the original work.
Some examples of why containers are an attractive technology to help with reproducibility include:
- The same computational work can be run across multiple different technologies seamlessly (e.g. Windows, macOS, Linux).
- You can save the exact process that you used for your computational work (rather than relying on potentially incomplete notes).
- You can save the exact versions of software and their dependencies in the image.
- You can access legacy versions of software and underlying dependencies which may not be generally available any more.
- Depending on their size, you can also potentially store a copy of key data within the image.
- You can archive and share the image as well as associating a persistent identifier with an image to allow other researchers to reproduce and build on your work.
Sharing images
As we have already seen, the Docker Hub provides a platform for sharing images publicly. Once you have uploaded an image, you can point people to its public location and they can download and build upon it.
This is fine for working collaboratively with images on a day-to-day basis but the Docker Hub is not a good option for long time archive of images in support of research and publications as:
- free accounts have a limit on how long an image will be hosted if it is not updated
- it does not support adding persistent identifiers to images
- it is easy to overwrite tagged images with newer versions by mistake.
Archiving and persistently identifying images using Zenodo
When you publish your work or make it publicly available in some way it is good practice to make images that you used for computational work available in an immutable, persistent way and to have an identifier that allows people to cite and give you credit for the work you have done. Zenodo provides this functionality.
Zenodo supports the archiving of tar archives and we can capture our Docker images as tar archives using the docker save command.
For example, to export the image we created earlier in this lesson:
docker save alice/alpine-python:v1 -o alpine-python.tar
These tar images can become quite large and Zenodo supports uploads up to 50GB so you may need to compress your archive to make it fit on Zenodo using a tool such as gzip (or zip):
gzip alpine-python.tar
Once you have your archive, you can deposit it on Zenodo and this will:
- Create a long-term archive snapshot of your Docker image which people (including your future self) can download and reuse or reproduce your work.
- Create a persistent DOI (Digital Object Identifier) that you can cite in any publications or outputs to enable reproducibility and recognition of your work.
In addition to the archive file itself, the deposit process will ask you to provide some basic metadata to classify the image and the associated work.
Note that Zenodo is not the only option for archiving and generating persistent DOIs for images. There are other services out there - for example, some organizations may provide their own, equivalent, service.
Reproducibility good practice
- Make use of images to capture the computational environment required for your work.
- Decide on the appropriate granularity for the images you will use for your computational work - this will be different for each project/area. Take note of accepted practice from contemporary work in the same area. What are the right building blocks for individual images in your work?
- Document what you have done and why - this can be put in comments in the Dockerfile and the use of the image described in associated documentation and/or publications. Make sure that references are made in both directions so that the image and the documentation are appropriately linked.
- When you publish work (in whatever way) use an archiving and DOI service such as Zenodo to make sure your image is captured as it was used for the work and that is obtains a persistent DOI to allow it to be cited and referenced properly.
Container Granularity
As mentioned above, one of the decisions you may need to make when containerising your research workflows is what level of granularity you wish to employ. The two extremes of this decision could be characterised as:
- Create a single container image with all the tools you require for your research or analysis workflow
- Create many container images each running a single command (or step) of the workflow and use them in sequence
Of course, many real applications will sit somewhere between these two extremes.
Positives and negatives
What are the advantages and disadvantages of the two approaches to container granularity for research workflows described above? Think about this and write a few bullet points for advantages and disadvantages for each approach in the course Etherpad.
Solution
This is not an exhaustive list but some of the advantages and disadvantages could be:
Single large container
- Advantages:
- Simpler to document
- Full set of requirements packaged in one place
- Potentially easier to maintain (though could be opposite if working with large, distributed group)
- Disadvantages:
- Could get very large in size, making it more difficult to distribute
- Could use Docker multi-stage build docs.docker.com/develop/develop-images/multistage-build to reduce size
- Singularity also has a multistage build feature: sylabs.io/guides/3.2/user-guide/definition_files.html#multi-stage-builds
- May end up with same dependency issues within the container from different software requirements
- Potentially more complex to test
- Less re-useable for different, but related, work
Multiple smaller containers
- Advantages:
- Individual components can be re-used for different, but related, work
- Individual parts are smaller in size making them easier to distribute
- Avoid dependency issues between different softwares
- Easier to test
- Disadvantage:
- More difficult to document
- Potentially more difficult to maintain (though could be easier if working with large, distributed group)
- May end up with dependency issues between component containers if they get out of sync
Next Steps With Containers
Now that we’re at the end of the lesson material, take a moment to reflect on what you’ve learned, how it applies to you, and what to do next.
- In your own notes, write down or diagram your understanding of Docker Containers: concepts, commands, and how they work.
- In the workshop’s shared notes document, write down how you think you might use containers in your daily work. If there’s something you want to try doing with containers right away, what is a next step after this workshop to make that happen?
Container Orchestration
Although you can certainly manage research workflows that use multiple containers manually, there are a number of container orchestration tools that you may find useful when managing workflows that use multiple containers. We won’t go in depth on using these tools in this lesson but instead briefly describe a few options and point to useful resources on using these tools to allow you to explore them yourself.
- Docker Compose
- Kubernetes
- Docker Swarm
The Wild West
Use of container orchestration tools for research workflows is a relatively new concept and so there is not a huge amount of documentation and experience out there at the moment. You may need to search around for useful information or, better still, contact your friendly neighbourhood RSE to discuss what you want to do.
Docker Compose provides a way of constructing a unified workflow (or service) made up of multiple individual Docker containers. In addition to the individual Dockerfiles for each container, you provide a higher-level configuration file which describes the different containers and how they link together along with shared storage definitions between the containers. Once this high-level configuration has been defined, you can use single commands to start and stop the orchestrated set of containers.
- Using Docker Compose for the Simple Deployment of an Integrated Drug Target Screening Platform
- Docker Compose Overview
Kubernetes is an open source framework that provides similar functionality to Docker Compose. Its particular strengths are that is platform independent and can be used with many different container technologies and that it is widely available on cloud platforms so once you have implemented your workflow in Kubernetes it can be deployed in different locations as required. It has become the de facto standard for container orchestration.
Docker Swarm provides a way to scale out to multiple copies of similar containers. This potentially allows you to parallelise and scale out your research workflow so that you can run multiple copies and increase throughput. This would allow you, for example, to take advantage of multiple cores on a local system or run your workflow in the cloud to access more resources. Docker Swarm uses the concept of a manager container and worker containers to implement this distribution.
Key Points
Container images allow us to encapsulate the computation (and data) we have used in our research.
Using a service such as Docker Hub allows us to easily share computational work we have done.
Using container images along with a DOI service such as Zenodo allows us to capture our work and enables reproducibility.
Tools such as Docker Compose, Docker Swarm and Kubernetes allow us to describe how multiple containers work together.